Sitting and Low Back Pain
One of the biggest contributers to low back pain (LBP) is prolonged and repetitive sitting. Lesson 2 offers a simple remedy to prevent and improve LBP. Just follow these easy tips, stretches and movements to a life with much less pain and even increased energy from a more efficient body.
Meet the Chair Jockey
A chair jockey is someone who spends too much time sitting on a daily basis. Prolonged sitting causes “deloading” of the tissues, which occurs from lack of gravity stress on the body and results in a weakening of the stabilizing muscles. This deloading reduces the body’s ability to resist gravity during sports or simply standing, and works on the following principles;
Sitting = non-weight bearing = poor muscle recruitment & posture = ↓ energy/productivity = ↑ injuries
Standing = weight bearing = ↑ leg and spine strength = ↑ energy & mental capacity = ↓ pain & injuries
The Chair Jockey Workout is designed to be simple and time efficient. It can be used throughout the day in the office or at home to keep the body’s stabilizing muscles strong and activated. This routine improves posture and reduces stress at the precise areas needed to reverse the harmful effects of sitting and repetitive movements, which add up at the end of the day and week and cause dull aches or even pain in the low back, neck, and shoulders. It is the best answer to a busy schedule of sitting and a life full of aches and pains.
It should take no more than 6 or 7 minutes each time and should be done in the order shown. They can be repeated throughout the day to break up the constant strain of non-gravity induced poor posture. These exercises are also ideal for traveling because they can be done in a hotel room without any equipment, although exercise tubing is good to have.
Exercise Descriptions
- Hold all stretches for 20-30 seconds with relaxed breathing
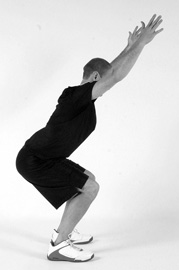
#1 – Squats
-
Squats can be done with the arms pointing upward or straight in front of the chest.
-
Suck in the stomach, squat down, and stick the hips backwards as if sitting into a chair.
-
Don’t let the knees go past the toes.
-
Move slowly and pause at the bottom, stretching the arms away from the body.
-
Keep the shoulders relaxed and the head in-line with the spine (pointing downward)
-
Repeat as many as time or effort permits.
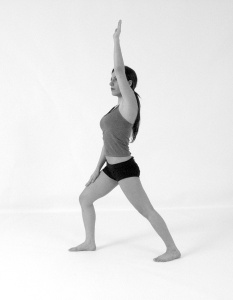
#2 – Front Thigh Stretch
-
This stretch can also be done with the back knee on the ground.
-
Suck in the stomach and squeeze the buttocks on the side of the leg in back.
-
Reach upward, don’t arch the low back, and slightly twist the torso away from the front leg.
#3 – Chest Stretch
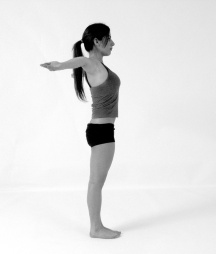
- Stand tall, stomach sucked in slightly, and relax the rest of the body.
- Squeeze the shoulder blades together and hold 5-10 seconds, continue breathing. Repeat 5-10 times.
A
-
B
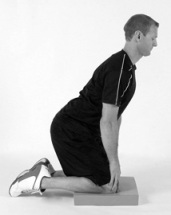
#4 – Upper Spine Extension
-
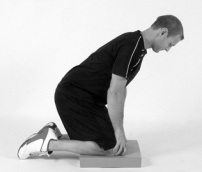
Kneeling on a pad, suck in the stomach and brace the upper body with hands on knees.
-
Slouch forward to assume the rest position.
-
Keeping the lower back stationary and stable, use the vertical muscles along the spine to push the chest outward (extending the mid/upper back).
-
Keep the head in line with the spine.
-
Hold for 10 seconds and repeat 5-10 times.
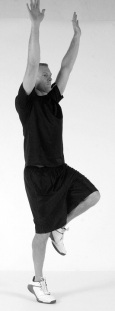
#5 – Toe Raises
-
Using 1 or 2 legs, (reaching upward is optional), raise yourself up onto the ball of your foot and repeat up and down slowly 15-30 times.
-
Keep the stomach sucked in and stay on the inside of the ball of the foot.
#6 – Front Thigh Stretch
A
B

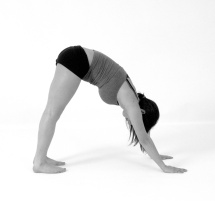
#7 – Push-up/Calve Stretch
- Starting in the calve stretch, try to push the heels into the floor and the chest towards the thighs.
- Keep the stomach sucked in with relaxed breathing.
- Transition into a push-up position (on knees or straight legs), and move up and down as slow as possible in order to work the back also.
- Do as many as time or effort permits.
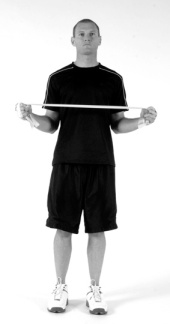
#8 – Rotator Cuff Strengthening
- Tubing is optional, but optimal.
- Keeping the elbows at your side, start with the hands in front of the belly button and rotate the arms so that the fists go away from the body.
- Hold at the end point for a few seconds and repeat slowly 15-30 times.
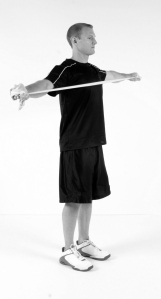
# 9 – Shoulder blade squeezes
- Tubing is optional, but optimal.
- Palms can face up or down.
- Keeping the stomach sucked in with upright, yet relaxed posture, start with the arms in front of the chest and squeeze the shoulder blades together and bring the arms backwards, posture should not change.
- Hold at the end point for a few seconds and repeat 10-15 times slowly.
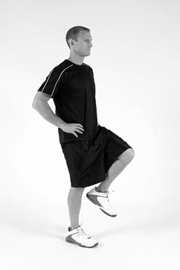
#10 – One leg balance
- Keeping the hips level, stand on 1 leg for 30-60 seconds, progressing to eyes closed.
- Focus on good body and foot posture.
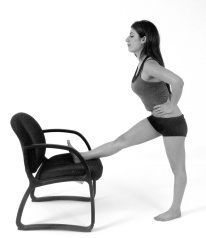
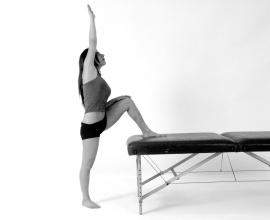
#11 – Leg stretch
- This can be done facing (not shown) and or twisting away from the chair.
- Place the foot up on a chair, keep the spine upright and slightly lean towards the foot.
- Stretch the foot up and down to add a stretch to the calves.
- Keep the stomach sucked in and don’t slouch the low back.
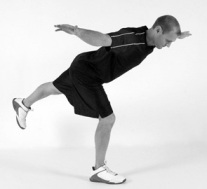
#12 – Spine/Back exercise
- Keeping the stomach sucked in without slouching the low back, squeeze both glutes and raise one leg.
- Hold the arms outward by squeezing the shoulder blades together.
- Keep the head in line with spine.
- Push the raised leg and arms out and away from the body. Hold for 15-30 seconds each side.
A
B
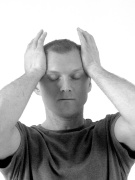
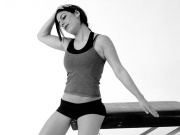
#13 – Neck stretching and facial relaxation
- Sitting, gently tug on the back of the head in all directions searching for tight spots in the neck muscles.
- Hold each tight spot for 20-30 seconds and focus on breathing.
- The other hand can be used to massage the area being stretched.
- After the neck is stretched, massage the temples while making every possible facial expression in order to energize and relax tension in the head.
- Lastly, focus the eyes on something distant to relax them.
Tips for Sitting
- ALWAYS use a lumbar support for the low back.
- Shift position constantly to distribute stress to various areas.
- When picking something off the floor or bending down, place one hand on a knee and slightly lift up the buttocks while maintain an arched low back.
- Don’t twist. Always face whatever task is at hand by turning the body as a unit.
- Don’t read papers that are flat on the desk. Prop them up so the head isn’t flexed all the way forward and down.
- Have the keyboard and mouse at the same level as the elbows when they are naturally hanging at your side. Also keep them at a forearms distance away from your body so that no reaching occurs.
- Use arm rests to take pressure off the low back.
- Keep the monitor about 18 inches from your eyes and make sure lighting is sufficient so that they are more relaxed.
- If you are on the phone a lot, support your “phone arm” with an elbow on the desk and switch sides often.
10. Posture is an attitude that creates a physical state. Be aware of deadlines and stress weighing down the body into poor posture. Use relaxed breathing and thoughts of what you are grateful for to improve posture and reduce stress.
11. Take frequent breaks to introduce movement to the body and keep its systems working efficiently, i.e. The Chair Jockey Workout.
12. Drink plenty of water.
13. Do the following exercises at the end of the day to reverse some of the damages caused by sitting.
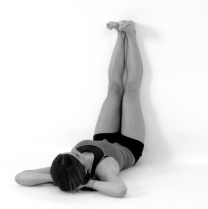
Leg Elevation on Wall
-
Laying on a flat surface, scoot the buttocks as close as possible to a wall and prop the legs up.
-
Lay in this position for 5-10 minutes to facilitate circulation of stagnant blood.
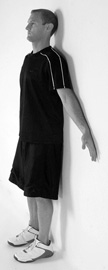
Standing Wall Posture Exercise
-
Standing with feet 3 inches from wall, keep the entire spine, back, and neck touching the wall by using the lower abdominals to “tuck in your tail”.
-
Hold for 3 minutes in a natural manner.
Filed under: Back pain | Tagged: Back pain, chris hallford, chronic pain, corporate workout, desk pain, desk workout, disc bulge, disc degeneration, disc disease, disc herniation, energy, exercise, exercise progression, fitness, foam roll, Health, injury prevention, knee pain, low back pain, Muscle Therapy, myofascial release, pain, sacroiliac joint, sitting, spondylolisthesis, stenosis | Leave a comment »


